
Pellet Grill Chicken Breast
Pellet grill chicken breast can be juicy, smoky, and full of flavor when cooked the right way. Many people think chicken breast always turns out dry on the grill. That is not true. I have cooked this cut for years on my pellet smoker, and once I learned the right temperature and timing, the results changed fast. You do not need a long brine or complex steps. You need heat control, proper seasoning, and one simple temperature rule. This guide shows you exactly how to get tender, flavorful chicken every single time.
Want to boost flavor in your dishes? Our guide to Beef Stew Seasoning shares simple ways to deepen savory taste.
Table of Contents
Why the Pellet Grill is Superior for Chicken Breast
A pellet grill cooks chicken breast differently than gas or charcoal grills. It works like a wood-fired oven with a built-in fan that moves heat around the food. This convection-style heat cooks the chicken evenly from all sides. You do not get hot spots that burn one end while the other stays undercooked.
This steady airflow is the key to better texture. Traditional grills blast direct heat from below. That often dries out lean cuts like chicken breast. A pellet grill surrounds the meat with controlled heat and clean smoke. The result is tender meat with a light smoky flavor.
Now let’s address the dry chicken myth. Many people think chicken breast needs a 24-hour brine to stay juicy. That is not true. When you control temperature and pull the meat at the right internal temperature, you lock in moisture without extra steps. The real secret is heat management, not soaking the meat overnight.
Low & Slow vs. Hot & Fast
Most recipes pick one temperature and stick with it. That limits the reader. The truth is, pellet grill chicken breast works well with two proven methods. Your choice depends on time and flavor goals.
Below is a clear comparison to help you decide.
| Method | Grill Temp | Cook Time | Result | Best For |
| Low and Slow | 225°F | 60 to 90 minutes | Deep smoke flavor, strong smoke ring, very tender texture | Weekend cooks and BBQ flavor lovers |
| Hot and Fast | 350°F | 25 to 30 minutes | Light smoke, slightly crisp exterior, juicy center | Quick weeknight dinners |
225°F: The Flavor Method
Cooking at 225°F allows more time for smoke to flavor the meat. This method builds a stronger smoke ring and deeper wood taste. The longer cook time gently brings the internal temperature up without shocking the meat. It is ideal when flavor matters more than speed.
350°F: The Weeknight Method
Cooking at 350°F cuts the time in half. The higher heat creates a slightly firmer outside while keeping the inside moist. You still get smoke flavor, just not as bold as the lower temperature method. This is perfect when you need dinner ready fast.
Both methods work. The key is to cook until the internal temperature reaches 160°F, then rest the chicken so it rises to 165°F safely.
Ingredients Needed
Simple ingredients make the best pellet grill chicken breast. Each one plays a clear role in flavor and texture.
For the Chicken
- 3 to 4 pounds boneless, skinless chicken breasts
Choose pieces that are similar in size for even cooking. Trim off any excess fat or loose pieces.
For the Binder
- 2 tablespoons olive oil
This helps the seasoning stick and promotes better browning on the surface.
For the Dry Rub
- 1 tablespoon smoked paprika
Adds color and a mild smoky depth. - 1 tablespoon garlic powder
Brings a bold, savory base. - 1 tablespoon onion powder
Adds gentle sweetness and balance. - 1 tablespoon kosher salt
Draws out moisture and boosts overall flavor. - 1 teaspoon black pepper
Gives a light heat without overpowering the chicken.
Optional for Finishing
- 1 to 2 teaspoons brown sugar
Adds mild sweetness and helps create better surface color during cooking. - BBQ sauce for basting during the final 10 to 15 minutes
This ingredient list keeps the focus on clean smoke flavor while building a balanced seasoning crust.
How to Make Pellet Grill Chicken Breast
Follow these steps closely. Each one builds flavor and protects moisture.
1. Prepare the Chicken
Pat each chicken breast dry with paper towels. This step matters. Dry surfaces help the seasoning stick and prevent steaming on the grill.
If some pieces are much thicker than others, gently pound the thick end to create even thickness. Uniform size means even cooking.
Drizzle olive oil over the chicken. Rub it across all sides with your hands. The oil acts as a binder for the dry rub and helps form a flavorful crust.
2. Mix and Apply the Seasoning
In a small bowl, combine smoked paprika, garlic powder, onion powder, kosher salt, and black pepper. Stir until the color looks even.
Sprinkle the seasoning generously over both sides of each breast. Press it lightly into the surface so it adheres well. Do not rush this step. A full coating builds strong flavor.
Let the chicken sit at room temperature for about 15 to 20 minutes while the grill preheats. This removes some of the chill and promotes even cooking.
3. Preheat the Pellet Grill
Set your pellet grill to 225°F for the low and slow method. If you prefer the faster method, set it to 350°F instead.
Use wood pellets such as apple for a mild sweet flavor or hickory for a stronger BBQ taste. Allow the grill to fully preheat with the lid closed. Stable temperature is key before adding the meat.
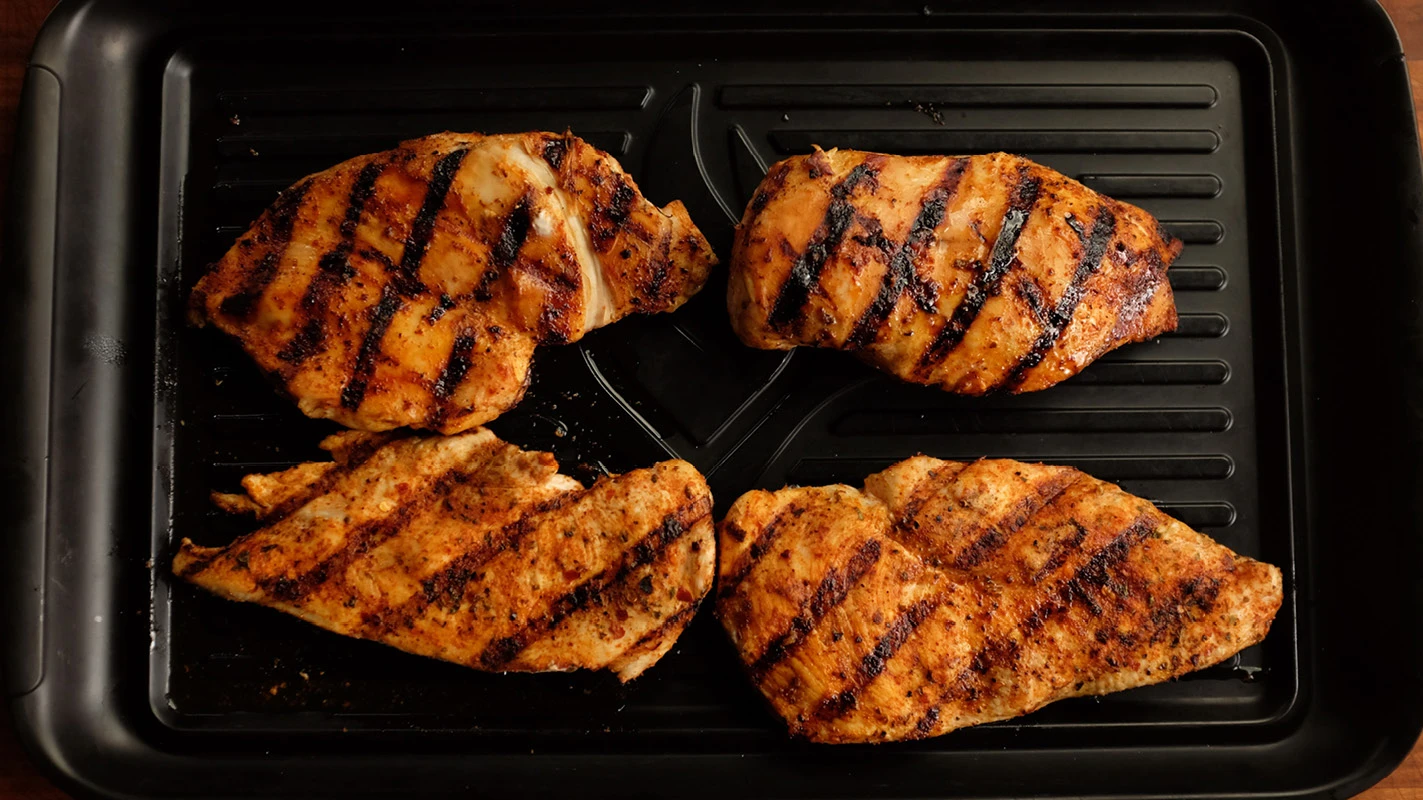
4. Place the Chicken on the Grill
Place the seasoned chicken breasts directly on the grill grates. Position them over indirect heat, not directly above the fire pot.
Close the lid and let the grill do the work. Avoid opening the lid often. Each time you lift it, heat escapes and cooking time increases.
At 225°F, cook for about 60 to 90 minutes.
At 350°F, cook for about 25 to 30 minutes.
5. Check the Internal Temperature
Use an instant-read meat thermometer to check doneness. Insert it into the thickest part of the breast without touching bone.
Remove the chicken when the internal temperature reaches 160°F. Do not wait for 165°F while it is still on the grill. The temperature will rise as it rests.
6. Optional BBQ Basting
If you want a glazed finish, brush BBQ sauce onto the chicken during the last 10 to 15 minutes of cooking.
Keep the lid closed after basting so the sauce sets properly. The sugars will thicken and cling to the surface.
7. Rest Before Slicing
Transfer the chicken to a cutting board or plate. Loosely cover it with foil. Let it rest for at least 5 to 10 minutes.
During this time, juices settle back into the meat and the temperature rises to the safe 165°F. Slice only after resting. Cutting too early releases moisture and dries the chicken.
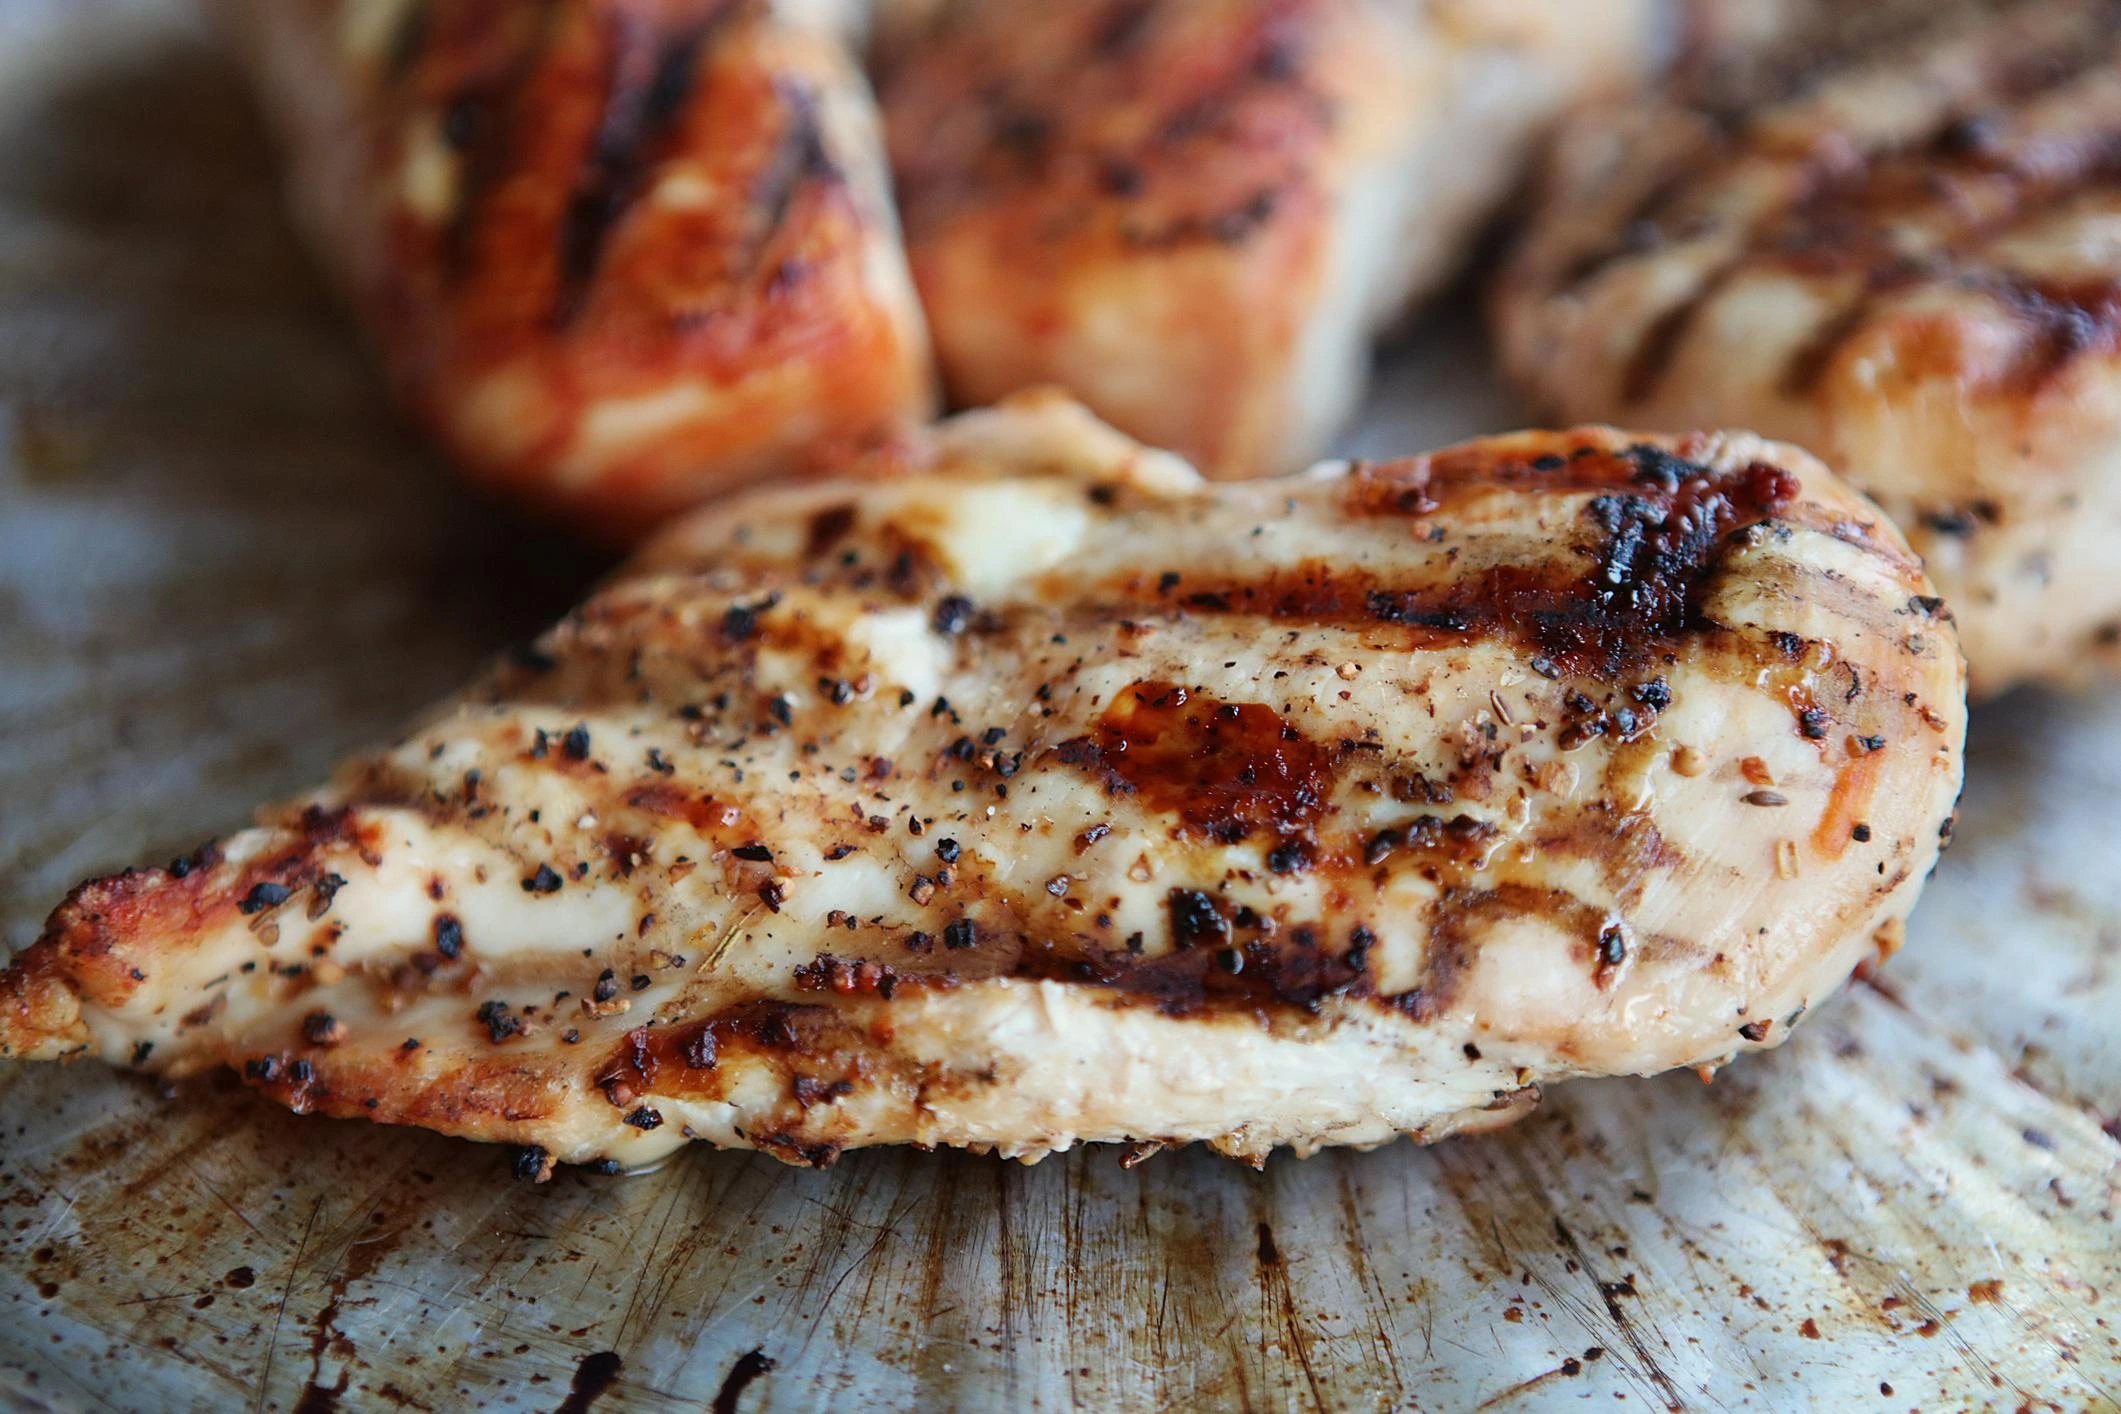
Once rested, slice against the grain and serve immediately.
Step by Step: How to Cook Chicken Breast on a Pellet Grill
This section breaks the process into simple actions you can follow every time.
Step 1: Prep and Season
Start with dry chicken breasts. Pat them with paper towels to remove surface moisture. This helps the seasoning stick and prevents a rubbery outside.
Coat lightly with olive oil.
Use a balanced dry rub made from paprika, garlic powder, onion powder, salt, pepper, and a small amount of brown sugar. The sugar supports browning and adds light sweetness without overpowering the smoke.
Press the seasoning firmly onto both sides. Even coverage leads to even flavor.
Step 2: Preheat the Grill
Set your pellet grill to your chosen temperature.
Use 225°F for stronger smoke flavor.
Use 350°F for a faster cook and slightly firmer exterior.
Choose your wood pellets carefully. Apple and cherry give a mild sweet smoke that pairs well with poultry. Hickory gives a stronger BBQ flavor.
Let the grill fully preheat with the lid closed. Stable heat matters more than rushing the process.
Step 3: Proper Placement on the Grill
Place the chicken breasts on the grates over indirect heat, away from the direct flame area. Keep space between each piece so heat can circulate properly.
Every pellet grill has a hot spot, usually near the back of the grill or directly above the fire pot. Avoid placing the chicken in that area. Position it slightly to the side so it cooks evenly and does not dry out on one edge.
Step 4: The Flip Question
Do you need to flip chicken on a pellet smoker?
In most cases, no.
Because pellet grills cook with circulating heat, the chicken cooks evenly from all sides. Flipping is optional and does not change much unless you want grill marks.
If cooking at higher temperatures, you may flip once halfway through for even browning. Keep lid openings brief to maintain steady heat.
Cook until the internal temperature reaches 160°F, then remove and rest before slicing.
The 160 Degree Rule: The Secret to Juicy Meat
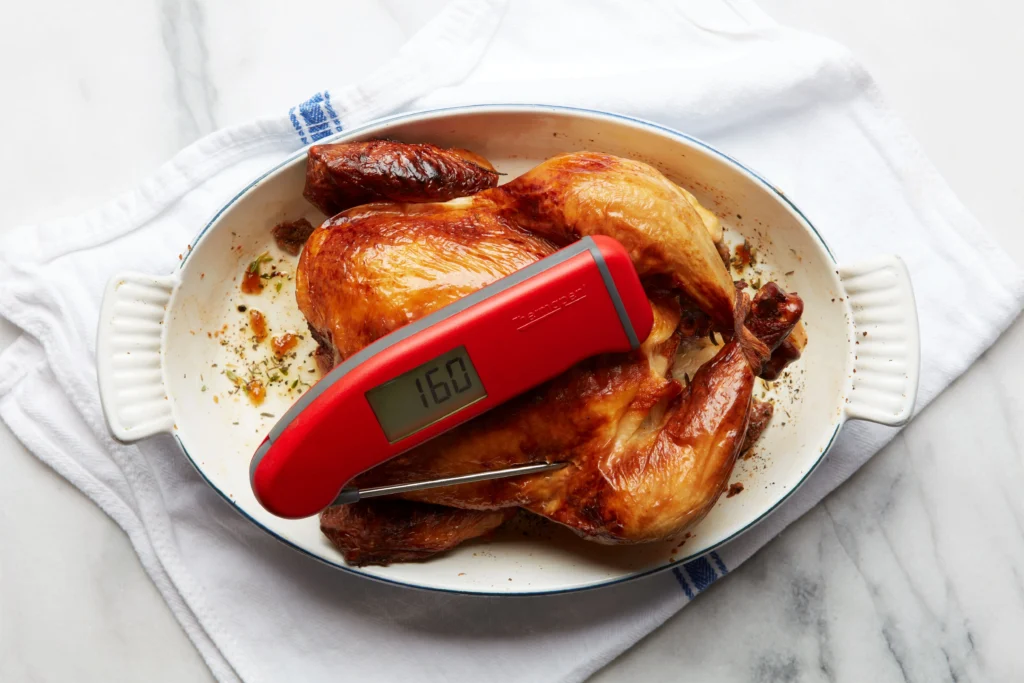
This is the step that changes everything.
Most people cook chicken breast on a pellet grill until it reaches 165°F while still on the heat. That often leads to dry meat. The real secret is understanding carry over cooking.
What Is Carry Over Cooking?
When you remove chicken from the grill, it does not stop cooking right away. The heat stored inside continues to rise for several minutes. This natural temperature increase is called carry over cooking.
For chicken breast, the internal temperature will usually rise about 5 degrees after removal.
The 160°F Action Plan
Pull the chicken off the pellet grill when it reaches 160°F in the thickest part.
Place it on a cutting board and loosely cover it with foil. Let it rest for 5 to 10 minutes. During this time, the temperature will climb to the safe 165°F recommended for poultry.
This method keeps moisture inside the meat instead of cooking it past the safe point.
If you remember only one rule for pellet grill chicken breast, make it this one. Remove at 160°F. Rest. Slice after the temperature settles.
Best Wood Pellets for Chicken
The type of wood pellets you choose will shape the final flavor of your pellet grill chicken breast. Chicken is lean and mild, so the smoke should support it, not overpower it.
Fruit Woods: Apple and Cherry
Apple and cherry pellets give a light, slightly sweet smoke. This flavor pairs naturally with poultry.
Apple creates a clean and gentle taste. It works well for simple seasoning blends.
Cherry adds mild sweetness and gives the chicken a deeper color on the outside. It is great when you want a rich look and balanced smoke flavor.
These are excellent choices if you want the smoke to stay subtle.
Hardwoods: Hickory and Oak
Hickory gives a stronger, classic BBQ taste. It is bold but still balanced enough for chicken when used at moderate temperatures.
Oak burns clean and steady. It produces a medium smoke flavor that sits between fruit woods and stronger hardwoods. Oak is a safe choice if you want more depth without going too strong.
You can also create your own pellet blend. Mix equal parts apple and hickory for a balanced smoke profile. The sweetness softens the bold edge, giving you rich flavor without bitterness.
Avoid Mesquite for Chicken Breast
Mesquite has an intense smoke profile. It works well for beef, but it can overwhelm lean poultry.
Because chicken breast has little fat, it absorbs smoke quickly. Mesquite can turn the flavor bitter and heavy. Stick with milder woods for better balance.
Choosing the right pellets makes a big difference. Match the wood to your flavor goal, and your chicken will taste clean, smoky, and well balanced.
Troubleshooting: Avoiding Rubbery Skin and Dry Meat
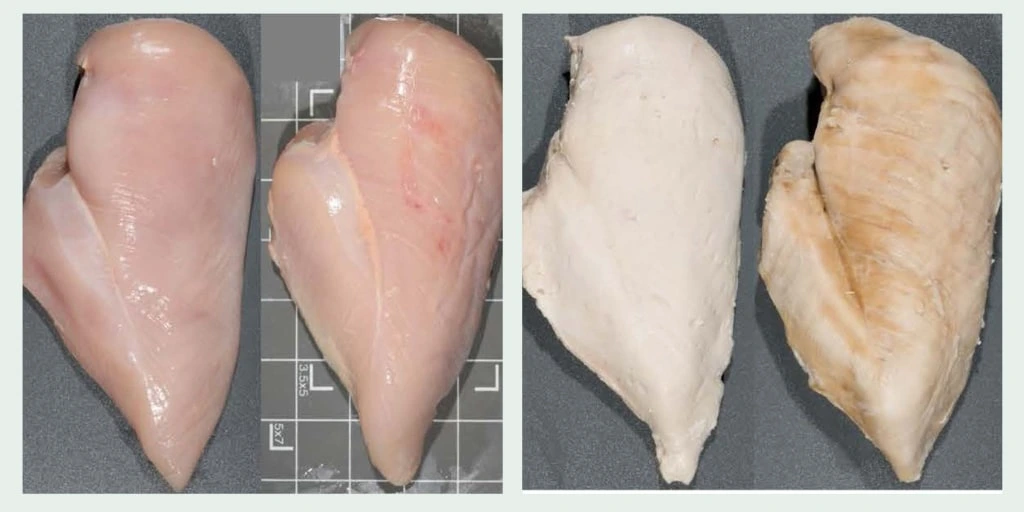
Even with a pellet grill, things can go wrong. Two common problems are rubbery texture on the outside and dry meat inside. Both issues have simple fixes.
Problem 1: Rubbery or Leathery Exterior
Cooking at low temperatures for a long time can sometimes create a soft or slightly tough surface. This happens when moisture sits on the outside and does not dry properly.
How to fix it:
Pat the chicken completely dry before adding oil and seasoning. Moisture on the surface leads to steaming instead of roasting.
If you cook at 225°F and want a firmer exterior, raise the grill temperature to 375°F for the last 5 to 8 minutes. This short high heat finish tightens the outside without drying the inside.
Problem 2: Dry Chicken Breast
Dry meat usually means it stayed on the grill too long.
How to fix it:
Always use an instant read thermometer. Remove the chicken at 160°F, not 165°F. Let carry over cooking bring it to the safe temperature while resting.
Also, avoid slicing immediately after removing it from the grill. Resting allows juices to settle back into the meat.
Small changes make a big difference. Control moisture, monitor temperature, and rest the chicken properly for consistent results.
Serving and Storage Ideas
Once your pellet grill chicken breast has rested, slice it the right way. Always cut against the grain. This shortens the muscle fibers and makes each bite more tender.
Serving Ideas
This chicken is very versatile. You can:
- Serve it whole with roasted vegetables and rice
- Slice it over a fresh green salad
- Chop it for tacos or wraps
- Add it to pasta or grain bowls
The mild smoke flavor pairs well with many sauces and sides.
What to Serve With Pellet Grill Chicken Breast
Pair your smoked chicken with simple sides that complement the wood flavor:
- Smoked Corn on the Cob
Sweet corn cooked on the grill adds natural sweetness and light char. - Creamy Coleslaw
The cool, creamy texture balances the smoky and savory chicken. - Grilled Asparagus
Lightly seasoned asparagus adds freshness and keeps the meal balanced.
These sides keep the meal simple while highlighting the smoky flavor of the chicken.
Meal Prep and Storage
Let the chicken cool fully before storing.
Place slices in an airtight container and refrigerate for up to 4 days. Keep the pieces whole if possible and slice only when ready to eat. This helps retain moisture.
For reheating, add a small splash of chicken broth or water. Warm gently in the oven at low heat until just heated through. Avoid high heat, which dries the meat quickly.
You can also freeze cooked chicken breast for up to 2 to 3 months. Wrap tightly and store in a freezer safe container. Thaw overnight in the refrigerator before reheating.
Proper slicing and storage keep your smoked chicken tender long after it leaves the grill.
Best Way to Reheat Without Drying Out
To reheat pellet grill chicken breast without drying it out, place the slices in a baking dish. Add 2 to 3 tablespoons of chicken broth or water. Cover tightly with foil and warm in the oven at 300°F for about 10 to 15 minutes, or until heated through. The added moisture and covered heat prevent the meat from drying.
Why this works well:
- Clear temperature
- Clear liquid amount
- Clear timing
- Direct answer format
Frozen Chicken section
Do not place frozen chicken breasts directly on a pellet grill. Frozen meat stays too long between 40°F and 140°F, which is known as the bacterial danger zone. This increases food safety risk because the outside may warm up while the inside is still frozen.
For best results, thaw chicken fully in the refrigerator overnight before cooking. This allows even heat penetration and reduces the time spent in unsafe temperature ranges.
Why this works well:
- Clear safety warning
- Uses the term “danger zone” naturally
- Short, direct, and practical
- Builds trust without sounding alarmist
This small addition increases content depth and improves credibility.
This structure increases the chance of appearing in a Featured Snippet because it directly answers the reheating question in a clean, step-based format.
Pellet Grill Chicken Breast
Ingredients
Method
- Pat the chicken breasts dry with paper towels. If needed, gently pound thicker ends to create even thickness. Drizzle olive oil over all sides.
- In a bowl, mix smoked paprika, garlic powder, onion powder, kosher salt, black pepper, and optional brown sugar. Coat the chicken evenly on all sides, pressing seasoning firmly into the surface. Let rest at room temperature for 15–20 minutes.
- Preheat the pellet grill to 225°F for low and slow cooking or 350°F for a faster method. Allow the grill to fully preheat with the lid closed.
- Place the chicken breasts on the grill grates over indirect heat. Close the lid and cook without frequently opening it. At 225°F cook for 60–90 minutes. At 350°F cook for 25–30 minutes.
- Check internal temperature using an instant-read thermometer. Remove the chicken once it reaches 160°F in the thickest part.
- If desired, brush BBQ sauce on the chicken during the final 10–15 minutes of cooking and allow it to set with the lid closed.
- Transfer chicken to a cutting board and loosely cover with foil. Rest for 5–10 minutes until the temperature rises to 165°F. Slice against the grain and serve.
Notes
Conclusion
Pellet grill chicken breast does not have to be dry or bland. With the right temperature, proper seasoning, and the 160°F rule, you get tender, smoky, and flavorful results every time. The choice between low and slow or hot and fast gives you full control based on your schedule and taste.
The biggest takeaway is simple. Pull the chicken at 160°F and let it rest to reach 165°F. That one step keeps the meat juicy and prevents overcooking.
If you tried this recipe, leave a comment and a star rating below. Your feedback helps others cook with confidence. Share this recipe on Pinterest or Facebook so your friends can try it too.
What wood pellets did you use? Let us know your favorite flavor combination in the comments.
Frequently Asked Questions (FAQ)
What temperature do you grill chicken breast on a pellet grill?
The best temperature depends on your goal.
Cook at 225°F for deeper smoke flavor and a slower cook.
Cook at 350°F if you want a faster meal with a slightly firmer exterior.
In both cases, remove the chicken at 160°F and let it rest to reach 165°F.
How long do you cook chicken breast on a pellet smoker?
Cooking time depends on grill temperature and thickness.
At 225°F, chicken breasts usually take 60 to 90 minutes.
At 350°F, they take about 25 to 30 minutes.
Always rely on internal temperature rather than time alone.
How long to cook chicken on a pellet smoker at 225 degrees?
At 225°F, most boneless skinless chicken breasts cook in about 1 to 1.5 hours.
Thicker pieces may take slightly longer. Use an instant read thermometer and remove the chicken at 160°F.
Do I need to flip chicken breast on a pellet grill?
No, flipping is not required.
Pellet grills cook with circulating heat, which surrounds the meat evenly. You may flip once if you want even browning, but it is optional.
At what temperature does chicken stop absorbing smoke?
Chicken absorbs the most smoke flavor while its surface is still moist and the internal temperature is below about 140°F.
Once the outer layer dries and the meat temperature rises, smoke absorption slows down.
Is 30 minutes at 400 enough for chicken?
It can be enough for thin chicken breasts. Thicker pieces may need more time.
At 400°F, check the internal temperature after 25 minutes. Remove the chicken once it reaches 160°F, then let it rest until it reaches 165°F.